Pointers on how to elevate a screenshot on a Windows PC (10 and 11)
Screenshots could well well even be counseled at work, needed for file-conserving, or requested by tech strengthen to higher illustrate a pc virus you’re experiencing.
There are a more than a couple of of how to manufacture this straightforward task in Windows, and we’ve detailed every of the readily available suggestions below. And lunge, these style of suggestions work devoted as effectively in Windows 11 as in Windows 10. Read on to stare ways to elevate a screenshot on a Windows PC.
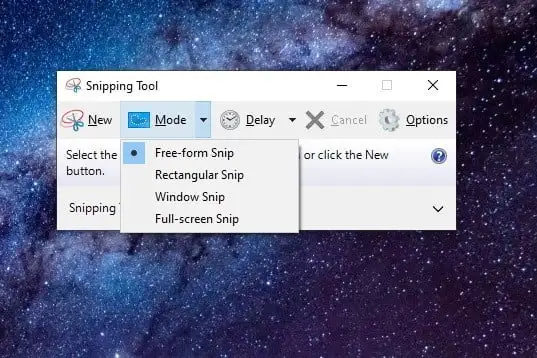
Image oldschool with permission by copyright holder
Pointers on how to elevate a screenshot on a Windows PC: the Snipping Instrument (Windows 10 and 11)
The very top native procedure is the Snipping Instrument. This constructed-in display hide-grab utility works effectively enough, however it’s now not basically the most sturdy or versatile by saving a snapshot. Nevertheless, it is a ways a utility that enables users to higher clarify and grab parts of their desktop level to as a screenshot. Here’s use it.
Step 1: To originate, devoted form snipping tool into the taskbar’s search box and pick out the ensuing app. If you are on Windows 10, as soon as it opens, you’ll get out about a notification that it’s “transferring to a brand unusual dwelling” in a later update. Draw now not concern. Even in Windows 11, it is silent an readily available tool, however Microsoft encourages you to use the Accumulate + Shift + S keyboard shortcut.
Step 2: On Windows 10, pick out the Mode button to produce bigger its menu. You’ll get four display hide-shooting choices: Draw a window (Free-accumulate snip), box in an house (Rectangular snip), grab the present window (Window snip), and grab the total display hide (Fat-display hide snip).
On Windows 11, that it is advisable well well absorb to either pick out Sleek or press the Windows key + Shift + S keyboard shortcut in uncover to originate a snip. Whenever that it is advisable well also unbiased absorb carried out either, the display hide will darken a bit and that it is advisable well be supplied with the four aforementioned “mode” choices on the high of your display hide.
Pick out one of these modes to originate your screenshot.
Step 3: Whenever you grab a screenshot, the Snipping Instrument interface will level to your screenshot. You’ll be able to also produce light edits fancy using a pen or highlighter, or erasing one thing.
(In Windows 11, this editing display hide can also unbiased existing up mechanically, or that it is advisable well well absorb to select a notification that pops up first in uncover to initiate the editing display hide.)
Step 4: Whenever you’re carried out editing throughout the Snipping Instrument, pick out File within the upper-left corner after which click on the Build as option listed on the plunge-down menu.
In Windows 11: Pick out the Build as disk icon within the high-elegant corner, title your file on the display hide that pops up, and pick out the Build button.

Image oldschool with permission by copyright holder
Pointers on how to elevate a screenshot on a Windows PC: Snip & Sketch (Windows 10)
Snip & Sketch is Microsoft’s newer model of its snipping utility. You’ll be able to also gain admission to this tool from the Launch up menu or by typing Accumulate + Shift + S in your keyboard. Here’s use it.
(Show: Snip & Sketch will not be any longer readily available on Windows 11 and has been replaced by a updated Snipping Instrument app that comprises parts of Snip & Sketch. That said, the following instructions (significantly steps 1, 2 and 4) can also unbiased silent silent be in overall elegant for Windows 11’s Snipping Instrument).
Step 1: In case you exercise the keyboard shortcut, the display hide darkens and renders a 5-button toolbar along the high. Which it is advisable well well absorb the identical capabilities existing within the older Snipping Instrument, however it doesn’t assign your screenshots as a file. As an more than a couple of, the image goes straight to your clipboard first.
Step 2: You’ll also get out about a desktop notification that informs you that the image has been copied to the clipboard. This same notification presents you the technique to edit the captured image throughout the Snip & Sketch app. You’ll be able to also gain admission to this latter option by selecting the desktop notification itself. In case you pick out the notification, the screenshot loads throughout the app, allowing you to reduce the image and practice a pen, pencil, highlighter, or eraser.
Step 3: In case you load the Snip & Sketch app as an more than a couple of, pick out the plunge-down arrow next to the Sleek button within the high-left corner and pick out Snip now within the plunge-down menu. The display hide darkens, and the 5-button toolbar looks. Rob your snip, and your required image can also unbiased silent mechanically load within the Snip & Sketch app, ready so that you can edit.
Step 4: Build the image wherever in your PC by picking the Disk-style button. In case you prefer to absorb to edit and assign the screenshot using any assign in image editor, pick out the Three-dot icon on the toolbar and prefer the Launch with option on the plunge-down menu. (In Windows 11, you are going to devoted pick out the Edit in Paint button, to edit the screenshot in Microsoft Paint.)
Pointers on how to elevate a screenshot on a Windows PC: keyboard shortcuts (PrintScreen)
Windows presents six how to take hang of your desktop as a characterize using keyboard shortcuts. Three are per the Print Show (PrtScn) key, while the last three require the Windows (Accumulate) key.
On exterior keyboards, you’ll get a real PrtScn key positioned within the upper-elegant corner. The Accumulate key assuredly resides on the lower-left, between the Protect watch over (Ctrl) and Alternate (Alt) keys. It sports the Windows assign, so it’s now not easy to maneuver over.
On laptops, the Print Show expose can also very effectively be blended with one other feature on a single key. On this case, it is advisable press the Feature (Fn) key as well to to the Print Show key.
Here’s a breakdown of the six display hide-grab instructions:
-
Print Show (PrtScn): Captures the total display hide. In case that it is advisable well also unbiased absorb bigger than one level to, this option captures every part proven across all connected displays as a single image. By default, this procedure doesn’t assign your image as a file, however merely sends the captured image to the Windows clipboard. (On Windows 11, pressing the Print Show button in your keyboard can also unbiased mechanically initiate the Snipping Instrument as an more than a couple of. However that it is advisable well disable this by going to Settings > Accessibility > Keyboard, then toggling off the Exercise the Print display hide key to initiate Snipping Instrument.)
-
Alt + Print Show: Captures a single window. Make obvious to highlight the target window first, equivalent to a doc or browser, sooner than pressing these two keys (or three on definite laptops). By default, this procedure doesn’t assign your image as a file, however devoted sends the image contained within the grab window to the clipboard.
-
Accumulate + Print Show: Captures the total display hide. The adaptation right here is that Windows saves the image as a file. By default, it’s despatched to C:Users
Photos>Screenshots or C:Users OneDrive>Photos>Screenshots in your PC. -
Accumulate + Shift + S: Captures a screenshot using the constructed-in screenshot tool known as Snip & Sketch (or the unusual Snipping Instrument app in Windows 11). The display hide dims and presents four decisions on a slight toolbar (now not including the Exit icon): Rectangular snip/mode, Freeform snip/mode, Window snip/mode, and Fullscreen snip/mode. This tool doesn’t assign captures as a characterize, however merely sends them to the clipboard.
-
Accumulate + G: Opens the Xbox Sport Bar. Pick out the Capture button after which the Digital camera icon, and this tool will assign a characterize to C:Users>(user title)>Videos>Captures by default.
-
Accumulate + Alt + Print Show: Captures very top the stuffed with life window. This expose saves a characterize to C:Users>(user title)>Videos>Captures by default.
In some conditions, the display hide flickers or dims to signify that Windows has grabbed a screenshot. If this doesn’t happen, initiate File Explorer and head to their respective default locations to compare if Windows saved your image.
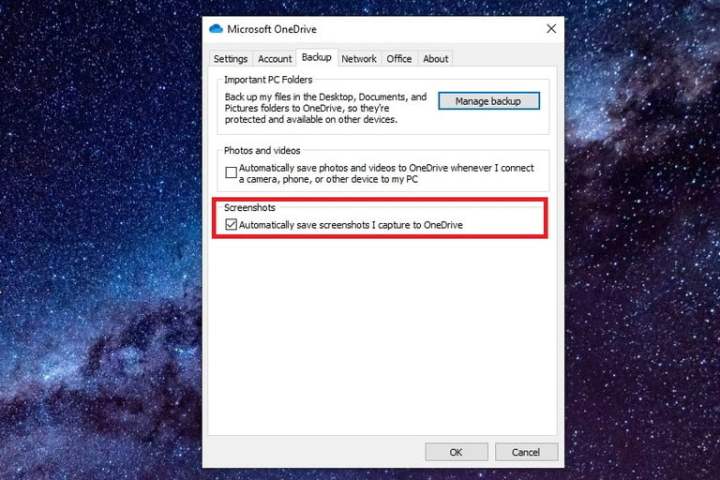
Image oldschool with permission by copyright holder
Pointers on how to elevate a screenshot on a Windows PC: Using OneDrive (Windows 10 and 11)
In case you’re using OneDrive, it could well in point of fact well assign you screenshots to the cloud so they’re accessible from every tool. It doesn’t assign screenshots by default, alternatively. As an more than a couple of, it is advisable pick the Cloud icon next to the Diagram clock (or within the Hidden icons menu marked with an upward-going by arrow).
If this icon isn’t performing, that it is advisable well also unbiased absorb to initiate the OneDrive app first and register to your narrative. After selecting the Cloud icon, prefer the Lend a hand & settings gear icon and pick out Settings on the pop-up menu. Subsequent, prefer the Backup tab within the ensuing pop-up window and take a look at the box below Screenshots. Then pick out OK.
(In Windows 11, after selecting Settings, prefer the Sync and backup tab on the left-hand facet. On the Sync and backup display hide, activate the Build screenshots I grab to OneDrive option.)
On this case, that it is advisable well press the predominant two Print Show instructions to mechanically assign a characterize file to OneDrive. You gained’t get out in regards to the display hide flicker or gloomy for these instructions — you’ll gain a notification as an more than a couple of. Make obvious to sync the Screenshots folder while you happen to prefer to absorb to gain admission to the pictures in your PC.
Pointers on how to elevate a screenshot on other gadgets
In case you’re attempting to stare ways to elevate a screenshot on a Mac as an more than a couple of of a Windows PC, taking a screenshot is great straightforward as effectively. There are a more than a couple of of how to gain it carried out, however the best entails using some helpful keyboard shortcuts. Account for + Shift + 3 will grab the total display hide, while Account for + Shift + 4 will mean that it is advisable well procedure out a more than a couple of box.
Must elevate a screenshot on a Microsoft Surface product? Test up on our helpful files that covers a unfold of suggestions.
In uncover to elevate a screenshot on a Chromebook, as soon as more, there are a pair of diversified suggestions, however the best is a keyboard shortcut. Protect watch over + Demonstrate Windows keys will grab the total display hide, while Protect watch over + Shift + Demonstrate Windows will mean that it is advisable well grab a pronounce house.
Editors’ Suggestions
-
The 6 easiest PC conditions in 2024
-
PC avid gamers — Windows 7, 8, and 8.1 are officially insensible
-
5 ways to elevate your PC from tiresome to elegant
-
Pointers on how to use a blue light filter in your PC or Mac
-
Here’s mix PDF files the easy contrivance